As a technical communication service business we chiefly develop user manuals for our clients. Our primary focus is on generating high quality content. Of course, to be competitive, we need to create the output in a fast and efficient way. That’s why we use (and are an former authorized reseller of) MadCap Software. As a brand advocate and ambassador, I was honoured to be invited to the early beta test of the latest major updates and enhancements added to Flare 11. During my testing, I was pleased to discover that almost all these improvements are focused on improving both quality and efficiency. In this review, I provide a brief overview and discuss the enhancements which are most valuable to me.
1. Frameless Website Output for HTML5
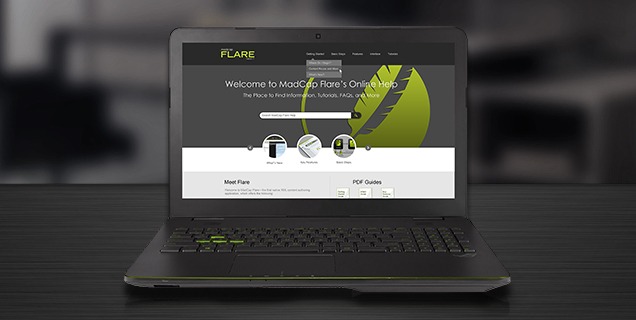
Let’s start with my favourite design enhancement: a new skin type that allows creation of HTML5 output with top navigation! This makes the online output look more like a traditional website and less like an online book (with the navigation pane on the left of your screen, the familiar tri-pane skin). This is a vast step towards a more dynamic web-based format. With this output option, it will be much easier to convince our customers to create multi-channel output from the same content and deliver a better customer experience. In my opinion there still is much to gain when it comes to user experience and usability. I am a big fan of the OverDrive case study (you can find the Overdrive webinar on the MadCap website), where they pushed Flare output to their own CMS to create a much more user-friendly environment – similar to what is now available out-of-the-box with Flare 11.
There are a few ways to create this new output with top navigation, but the easiest way is to use one of Flare’s built-in HTML5 top navigation templates when creating a new project.
Pay some attention when you want to make the output responsive. With the traditional tri-pane skin, you can enable or disable responsive output on the Setup tab in the Skin Editor. But for top navigation skins, you will notice that the responsive output section is not included in the Skin Editor. However, there is an additional responsive output setting in the Target Editor for HTML5, that is available for both top navigation and tri-pane outputs. This setting lets you enable device width media queries for responsive output. Why this is different from the standard tri-pane process is unclear to me, but I guess it has something to do with the horizontal stretched top navigation.
2. Absolute Positioning, Z-Index, and Text Wrapping
Another of the other major design features is called “absolute positioning.” I like absolute positioning because it makes it far easier to place elements anywhere you like and provides much more design freedom.
This new capability basically means that you can drag and drop elements (like images) anywhere in the content. You might recognize a similar concept from Microsoft® Word™ where it is called text wrapping. To activate absolute positioning, you set the position to “absolute” via the stylesheet, or you can right-click on your image and select the text wrap option.
When right-clicking you will also find that there are three primary ways (in addition in line with text) to display absolutely positioned elements in relation to the other content:
- Square – wraps text around the absolutely positioned element on any or all sides. This feature is for PDF only. Other outputs will ‘float’ the image with the text wrapping left or right.
- Behind Text – places the absolutely positioned element behind text.
- In Front of Text – places the absolutely positioned element in front of text.
I haven’t tried elements other than images yet, but according to MadCap you can use absolute positioning for any kind of element, including div tags, paragraphs, and more. What I did try, however, is selecting an object that I just placed behind the text. There is a little trick for doing this: by triple clicking on the content where the absolutely positioned element is placed in, this will select that block of content. Then you can click once on the element to select it.
3. Dictionaries (global) and Spell Check Enhancements
I just love the enhancements that have been made to dictionaries and the spell checking window. In addition to a little redesign, some new options have been added as well. In Flare 10 it was possible to look in your current document, the whole project, all open documents or all documents in the same folder. With Flare 11 it is also possible to look in a content folder or to pick a folder.
Flare 11 spell check also makes it possible to not just scan topics, but also to scan snippets, TOC’s, glossaries or index keywords. And when a spelling has been corrected, it is possible to add it to a Project Dictionary or a Global Dictionary.
This brings me to another improvement: the option to create global dictionaries. In previous versions, Flare supported only custom dictionaries at a project-level. This means that the dictionaries created were related to specific projects. A global dictionary can be opened in any project to use it for spell checking. This is very useful when you work with a team of (tech) writers and want to make sure you are all using the same spellings for certain terms.
The product dictionaries are located in the Advanced folder of the Project Organizer. A global dictionary is stored in your AppData folder by default. However, you can store the global dictionary in any location using the Options dialog. You can also tell Flare to ignore certain types of words or circumstances during spell check.
The spell check process has also been improved. To start Spell Checking, select Tools>Spell Check Window from the Ribbon and click the Start button. After starting spell check, all locations of the word which is not in the dictionary are displayed at the bottom of the Spell Check window. With this improvement you don’t need to open a multiple files anymore. This makes spell checking much easier than the old method! The dictionary and spell check enhancements have a major impact on content quality and efficiency.
4. Augmented Reality
I am always interested in the latest developments on the field of Augmented Reality (AR). About a year ago I experimented with Metaio Creator a bit and during MadWorld 2014 (the most awesome TechComm conference ever) MadCap lifted a little corner of the veil regarding their plans to integrate AR with Flare. I am thrilled to see that Flare 11 supports AR scenarios now. This is more evidence that my favourite authoring tool supplier responds to new developments, which I find very important.
Augmented Reality (AR) describes a technology that blends digital content into our real world.
Basically you tell the AR software to recognize an image, object or location when scanned with a smartphone, tablet or smart glasses. When recognized, the software enriches/projects digital content using your mobile or tablet device. The Metaio output is called an AR scenario.
In Flare, AR scenarios can be included in both print and online outputs. To do so, you first add the images you want to use for AR in your Flare project. The image then needs to be exported to Metaio Creator using Flare (see documentation). A link will be established between the Flare image and the corresponding AR scenario. Users of your content will then need to install the free Metaio Junaio app in order to scan the image and get the AR experience. Awesome!

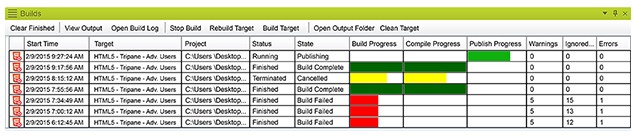
5. Target Background Builds
With Flare 11 you can now build multiple targets in the background, which is a massive time saver!
In previous versions, the only known way I knew to build output was by opening a target and start building it by clicking the Build button and wait until the project was built. This option has been replaced. When you generate a target in the interface of Flare 11, it builds the output in the background via Madbuild.
The most noticeable aspect of this change is that, when you generate a target, the Build Progress dialog no longer opens. Instead, the Build window pane opens at the bottom of the workspace. One of the greatest benefits of this change is that you can continue working in your project while you generate one or more targets behind the scenes.
If you are concerned about Flare slowing down during builds, you may want to limit the number of targets that can be generated at the same time. You can set the maximum amount of targets in the Build tab of the Options dialog.
6. Doc-To-Help Import
This enhancement didn’t come as a surprise to me, but I am amazed at how quickly MadCap implemented the Doc-To-Help import feature. MadCap’s acquisition of Doc-to-Help was just announced in January and within months they’ve made it possible to import Doc-To-Help files into Flare!
I am not a Doc-To-Help user, but for those who are, to import a .d2h file you select File>New Project>Doc-To-Help Project from the Ribbon. When importing you need to take some important things into account to make the conversion as smooth as possible. Flare Help gives a good overview of the steps to take.
7. Embedding YouTube and Vimeo Videos
I am familiar with this feature from our company’s web-CMS. If you store movies on YouTube or Vimeo, or use third-party movies from these providers in your content, you can now add these videos to web-based outputs. There are two ways to insert YouTube and Vimeo movies:
- Embedding movies. By choosing Insert>Multimedia from the ribbon, the movie is embedded into the topic or snippet. In addition, it is possible to specify advanced settings, such as whether to automatically start the movie when it displays, and what kind of information to display on the movie.
- Linking to the movie. By choosing Insert>Hyperlink from the ribbon, you can add a link to the video. The user then needs to click the text link in order to open the movie. When you insert a YouTube or Vimeo link in your output, it will send you to the host website to play the movie rather than embedding the video.
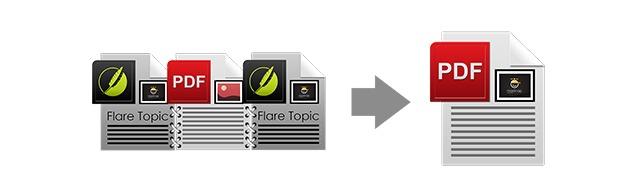
8. PDF Stitching
Sometimes you accept doing things the way a tool makes you do them and stop thinking about potential improvements. That’s why I am thrilled that you can now stitch existing PDFs into your output by adding links to them in a table of contents (TOC). This functionality is supported in both pdf output and all of the online targets. My personal experience is that in Europe we still create print output for user manuals most frequently (compared to online output), simply because it is mandatory because of CE marking (European conformity assessment). Quite often our customers can provide us with appendices, such as a spare parts lists and P&ID’s (piping and instrumentation diagrams). In previous versions we inserted PDFs as an image into a topic, sometimes even after converting it to a PNG or JPG, or we simply inserted empty appendices at the end of our TOC, to replace them later with a print of the pdf.
In Flare 11, you can now stitch a PDF into the Flare output by adding the finished PDF(s) to the Content Explorer in your project. The easiest way to do this is to open Windows, copy the PDFs, and paste them into the Content subfolder of your project. In Flare you then open a TOC file and you drag the PDF to the TOC from the Content Explorer. When generating your target, the PDF appears in your output. The stitched PDF pages will be inserted at the location represented by the entry in the TOC. Be aware, if you insert a finished PDF in the middle of topic entries in the TOC, the topics after the inserted PDF will increment page numbers accordingly.
9. Pinning Enhancements
I found two pinning enhancements in Flare 11: pinning your favourite fonts and pinning favourite projects.
Pinning fonts can be done in the Font selection list box. Now you can pin both your favourite fonts and font sets and move them to the top of the font list for quick access at any time. This makes them easier to find later. Also the Font Properties dialog has been rearranged to allow for more space for a larger font selection list box. Expandable groups for recently used fonts, pinned fonts, defined font sets, and all system fonts have been added.
From the Start Page you can now also pin your favourite projects to keep them displayed at the top of the list. To pin a project, hover over any recent project and click the little pin. It will then be moved to the top of the list. To unpin a project, just click the pin again and it will be moved back to the bottom section of the list.
10. Search Enhancements
Will the Flare algorithm become just as smart as Google’s search? The search result algorithm has been significantly updated in Flare 11 in order to provide more accurate and intuitive search result in the web-based outputs. Flare also updated the way search results are ranked, so you can optimize your content based on where keywords are located in a topic. Flare ranks topics based on where keywords appear in a topic. These rankings are as follows:
- Title tags
- Heading 1
- Heading 2 OR abstract text (i.e., meta description)
- Heading 3
- Heading 4 OR index keywords
- Heading 5 OR glossary terms
- Heading 6 OR keywords in body text
There are quite a few improvements regarding the HTML5 search; the Flare search engine now ranks HTML5 search results using two factors: relevance and importance. Relevance is determined by the number of times the search term appears in a topic and where it appears in the topic, such as in headings, index markers, or tags. Importance is determined by the number of links to a topic in the output. A topic that is linked to/from several other topics is ranked higher in importance than a topic that is only linked to/from one other topic. It is generally assumed that the Google algorithm works similarly (though semantics have become more important for Google recently).
The search engine uses a combination of Relevance and Importance to determine search results. When you search, the search engine considers the number of links to a topic as well as the number of times a search term appears in that topic. This gives you the most accurate results. You can choose to turn off Importance and search using only Relevance. This is not recommended unless you have one topic that is linked to so many times that it would skew your search results.
If you want to toggle Importance on or off, you need to open an HTML5 target. Then select Include Importance on the Advanced tab of the Target Editor.
Conclusion
Considering the fact that we use Flare in our business on a daily basis, I am always excited to see a new release. I believe Flare 11 boasts some major new features and improvements aimed at improving quality (both design and content) and user efficiency. Additionally, new technology enhancements, such as augmented realty, give me great confidence that MadCap Software makes every effort to give technical writers and content developers the best possible tool in the market. MadCap Software again proves to be a leader, and eager to push the envelope to look well beyond the status quo. Once again, MadCap sets the new industry standard with Flare 11.
This article was originally published in STC’s Intercom